You are not logged in.
- Topics: Active | Unanswered
#576 Re: Hardware & System Configuration » What tool for software updates + notifications? » 2018-09-23 19:57:23
I use the PointLinux Update Notifier. It's just a python script, so no extra dependencies.
It shows a notification in the system tray and pops up a notification on the desktop when updates are available. I use it just to be notified of available updates, then I update through the terminal. However, if you click the icon that appears in the system tray, it will ask for your password, then open Synaptic and show the available updates. Click to mark them to be installed, and Synaptic takes care of it.
You do have to edit the script to change the icon that's used in the notifications. I also change the number of minutes that elapse between update checks, but that's voluntary on my part.
If you're interested, I'll zip the .deb package, the icon that I use, and the easy instructions...you can use any icon you want though.
There is something similar in the repos, but I haven't tried it. I was going to, but it was going to install a bunch of other stuff. Can't remember the name of it. I'll check in a little bit and edit this post with the name of the package.
Edit: That package is called pk-update-icon.
#577 Re: Devuan Derivatives » [MiyoLinux] New Releases Uploaded » 2018-09-22 20:45:10
It's dope and I like the colors. I also like what zephyr did with CROWZ but I wish he had a 32 bit ISO.
Do you provide a SHA256SUMS.asc as well?
Thank you.
Yes, Zephyr does outstanding work! ![]()
Per your inquiry, I've uploaded the checksums to both OSDN and SourceForge.
Thanks again!
#578 Re: Devuan Derivatives » [MiyoLinux] New Releases Uploaded » 2018-09-22 19:20:50
Miyo-Modern is now available...
This release was built to provide users with a modern-looking desktop while still being low on resources. As such, I chose to give the system a "Deepin-like" look. Please be aware...Miyo-Modern is still based on Openbox; therefore, there are no actual Deepin applications nor any part of the dde (deepin desktop environment). It's simply Openbox that has been given a look and feel that is similar to Deepin... The name Deepin belongs to Wuhan Deepin Technology Co., Ltd. All of the Deepin items that I have used in this build are licensed under GPL-3.0; therefore, I must license this build as the same.
Fair warning: I included pulseaudio and pavucontrol in these builds.
If interested, they can be downloaded from...
...or...
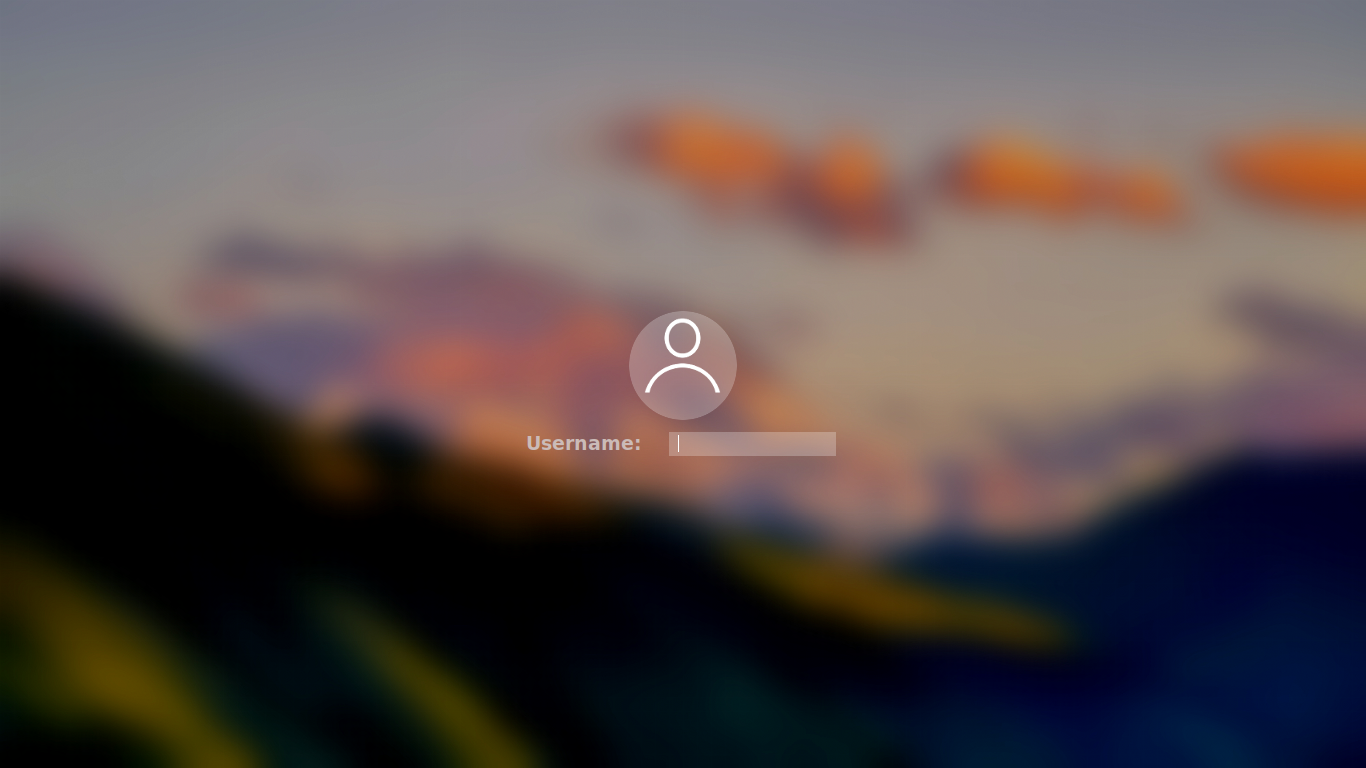
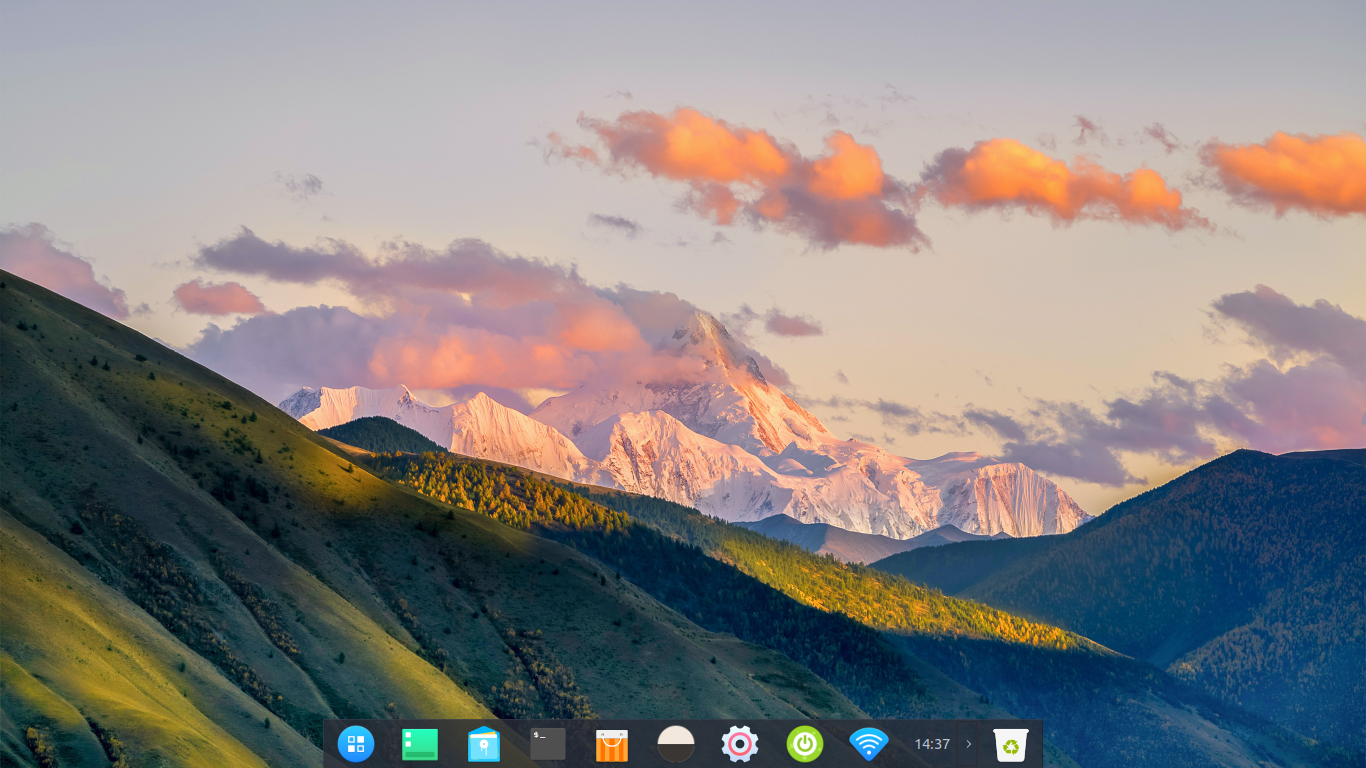
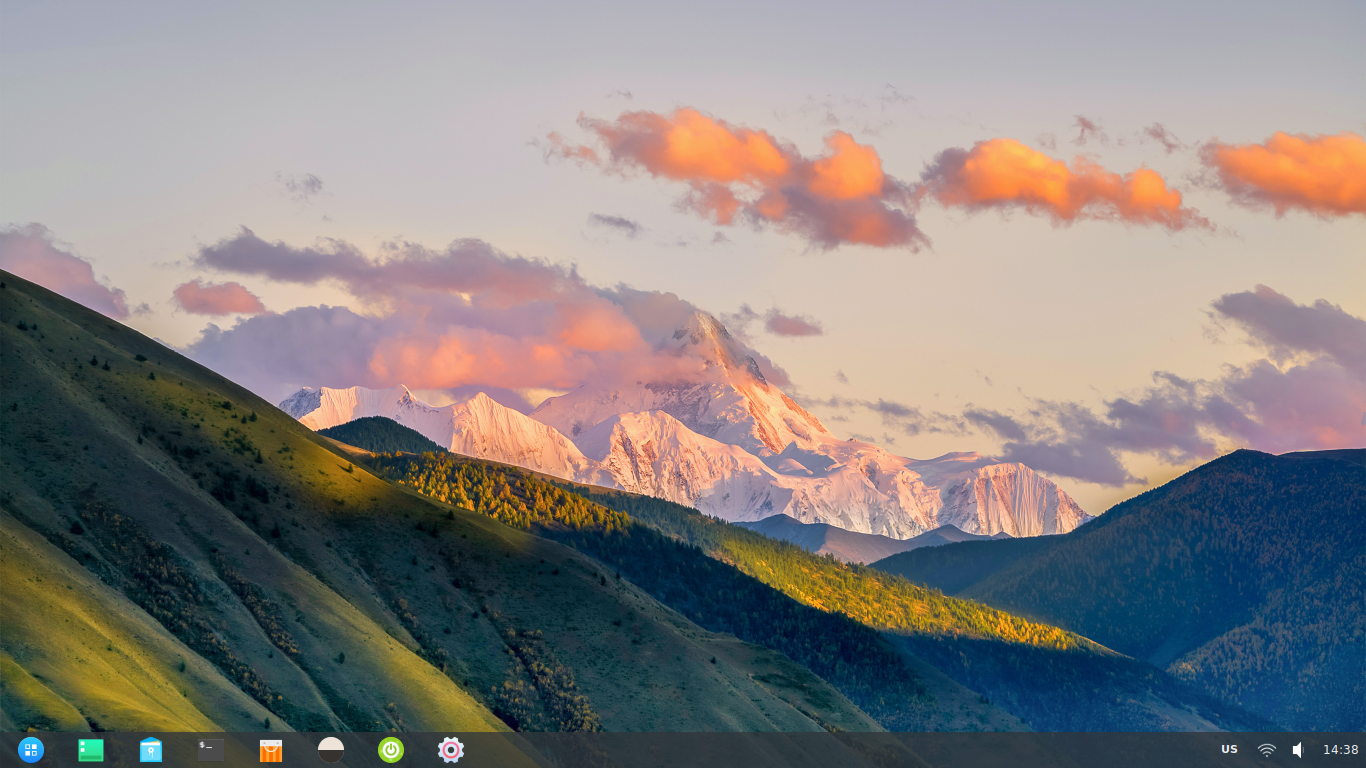
A few screenshots...
The login screen (Slim)
The default desktop...
Alternative panel...
#579 Re: Off-topic » The Last One to Post in this Thread Wins! » 2018-09-21 23:49:48
@Miyo . . . what are you smoking?
Not smoking anything, but I'm burning this thread up, 'cause I'm determined to be the winner!
![]()
#580 Re: Off-topic » Music » 2018-09-21 22:25:25
Shanghai Chinese Traditional Orchestra: Tortoise(Water)
(not sure why they used the album cover for Tiger)
https://www.youtube.com/watch?v=HLEWeTA … GUyxaPha4a
This is wonderful! Thank you!
#581 Re: Off-topic » The Last One to Post in this Thread Wins! » 2018-09-21 20:09:17
Do we really need to bloat our backups with this?
Ahhh...
I see that you tried to craftily sneak in (under the guise of Administrator concern) hoping that; in effect, it would stop others from posting after you; whereas, you would then be the rightful winner.
It didn't work...'cause now we see who's winning!
Mwu ha haaa!
#582 Off-topic » The Last One to Post in this Thread Wins! » 2018-09-21 08:13:17
- MiyoLinux
- Replies: 9
Looks like I'm winning! ![]()
LOLOLOLOL!!!
#583 Re: Off-topic » Music » 2018-09-20 08:45:53
Good music!
David Bowie experiencing dying and shares it with us.
Thanks!
Now for a blast from my past! ![]()
#584 Re: Installation » No sound in firefox-esr 60.2 » 2018-09-18 22:37:35
Thank you MiyoLinux.
Sorry MiyoLinux i have nothing against you, I hope you have understood.
Thank you for the answer and solution, but sorry for me is an unacceptable solution.
Because this is another situation where we see a meddling of the same "characters" who created systemd and a short-sighted approach of the Firefox developers. Chrome/Chromium is "made" from Google and I do not want to use it.
So I pinned firefox with /etc/apt/preferences.d/firefox-esr like this:Package: firefox-esr
Pin: version 52.9.0esr-*
Pin-Priority: 1001...while it lasts.
Thank you, again MiyoLinux.
Bye..mario
I understand! ![]()
Each user "should" be free to do what is best for their own personal situation. ![]()
In my case, I am a very boring user and my web browsing is very limited; therefore, my "fix" suits me and my situation...it may not be what's best for others. Take care friend! ![]()
Edited to add: My reasoning for creating a new desktop file is this...it simply negates the need to edit the original Firefox ESR desktop file when new versions are released. ![]() I'm okay with having two "Firefox" listings in my menu, but others may be opposed to that.
I'm okay with having two "Firefox" listings in my menu, but others may be opposed to that. ![]()
#585 Re: Devuan Derivatives » [MiyoLinux] New Releases Uploaded » 2018-09-15 23:55:00
Been working on this off and on now for a while...it's getting close.
#586 Re: Installation » No sound in firefox-esr 60.2 » 2018-09-15 16:27:44
@MiyoLinux . . . Thank you! That is perfect for when the time comes. Won't go there until there is no other option.
Sorry golinux. I just edited that post, because I remembered something...it's explained in the edit.
#587 Re: Installation » No sound in firefox-esr 60.2 » 2018-09-15 15:05:28
Hi all.
Sorry for my poor english and probably for crosspost .
With 60.2.0esr-1~deb9u2 and ALSA i have no sound with Firefox when i browse site like youtube with console error "OpenCubeb() failed to init cubeb". Probably because of this https://gitlab.com/Monsterovich/firefox-fuckpa ?
I installed chromium on my Devuan ASCII and audio of the site with audible content work great.
Excuse me for this rant.
Bye..mario
Hi DuaneBarry!
Yes, the latest version of Firefox-ESR requires pulseaudio for sound. However, you can still use it with ALSA. ![]()
First, you need to install apulse...
apt install apulseNow, with that installed, open your terminal (or Run Command), and enter...
apulse firefox-esrWhen Firefox opens, go to YouTube and see if sound works. If it does...
I edited this, because it had been so long that I forgot what I actually did. I had to go to another partition to make sure I was correct, because I remembered that my original instructions didn't work for me. ![]()
Open your file manager. Make it show hidden files. Navigate to ~/.local/share/applications (if you don't have that folder, create it.)
Create a new file, and name it anything you like, but it has to end with .desktop. I named mine ffesr.desktop
When the file opens, copy and paste the following into it...
[Desktop Entry]
Name=Firefox
Exec=apulse firefox-esr
Terminal=false
Type=Application
Categories=Network;
Icon=firefox
Notice the name is Firefox. That will differentiate it between Firefox-ESR and this one (that you're creating) in the menu.
Save and close the file. It should appear in your menu after that.
#588 Re: Off-topic » Music » 2018-09-11 08:06:32
#589 Re: Off-topic » Music » 2018-09-07 09:01:29
Another from my Epic music collection...and probably my favorite one! ![]()
...just wish it lasted longer! ![]()
#590 Re: Off-topic » Music » 2018-08-23 07:41:48
Beating Wal-Mart to the punch by giving Christmas earlier than ever! ![]()
Trans-Siberian Orchestra LIve: O Come All Ye Faithful/O Holy Night: Featuring Joel Hoekstra
#591 Re: Off-topic » Music » 2018-08-22 07:37:58
#592 Re: Off-topic » Music » 2018-08-20 05:36:37
#593 Devuan Derivatives » MiyoLinux Portable » 2018-08-20 04:52:32
- MiyoLinux
- Replies: 21
Someone recently left a very nice review for MiyoLinux on Sourceforge. I wish that I could personally thank the person; however, there's no way to respond to reviews. So if you read this tomastobyb, thank you very much! ![]()
In his review, he said that he would like to see a MiyoLinux with persistence. I don't know if that user will ever see this, but perhaps so...or perhaps it will help others who may be interested.
I've been using a portable version of MiyoLinux (that I installed onto a USB) for almost 2 years now. However, I recently made a new one with the release of ASCII.
One of the great things about the Refracta Installer, is that you can easily install the OS onto a USB...it's just like installing it to your hard drive, but you choose to install it onto a USB (not the one you're running live from). As with a normal system, it will save files, installed applications, etc. You can even apply updates like a normal system...I was somewhat wary of that due to the fear of degradation of the USB, but I'm a wild man who likes to live on the edge of the blade! LOLOLOL!!! ![]() I've been updating that original portable for 2 years now, and the USB is still going strong!
I've been updating that original portable for 2 years now, and the USB is still going strong! ![]() Instead of attempting a dist-upgrade from Jessie to ASCII on it, I decided to just make a new portable version with ASCII.
Instead of attempting a dist-upgrade from Jessie to ASCII on it, I decided to just make a new portable version with ASCII.
If you're familiar with the Refracta Installer, here are the basic steps that I use to make a portable version of MiyoLInux...
Needed:
a) 2 USB's (one for the live environment that you burned the .iso onto, and one to install the system onto).
b) Enough USB slots on your computer! ![]()
Depending on your intended use for it and the amount of installed applications and updates, you could probably get by with an 8 GB USB. The installed system out of the box is only a little over 2 GBs. However, I personally use a 32 GB USB for mine.
Installation:
1. Boot into the live environment.
2. Open gparted to see what the live usb is designated as; such as, sdb1. (Your designation may differ).
3. Open the file manager.
4. Insert the USB that you will be installing the system on.
When it appears in the file manager, right-click on it (in the side pane of the file manager) and choose "unmount".
5. Check gparted again to see what the new USB is designated as. Write it down if you want to make sure you choose the right partition/device to install the system onto.
6. You can go ahead and partition the USB now with gparted, or you can do it during the installation. Whether now or later, you have a couple of options...
Partition the USB like any hard drive; such as, partitions for root, home, and swap ... or ... just root and swap. I used root and a 1 GB swap on my original portable version.
Create one single partition for root on the entire USB, and choose a swap file during the installation (instead of making an actual swap partition). This is the method that I used on the latest one
To create a swap file during installation, just don't choose a partition when it asks you to choose one for swap. Just click OK. A message will appear telling you that a swap file will be created. ![]()
7. Go through the installation as normal, JUST MAKE SURE TO INSTALL THE SYSTEM ONTO THE CORRECT USB, AND INSTALL GRUB ONTO THE USB!!! I'm not yelling...just want to make sure that folks see that...
Now, when the installation is finished, and you boot into your portable version, it will be listed at the top of the Grub screen when you boot it up. It will have added any other OSs that are on your system to the portable's grub. If you'd rather only have the portable listed on the Grub screen, you can see how to quickly do that HERE.
#594 Re: Hardware & System Configuration » [solved] No sound since uninstall of pulseaudio » 2018-08-18 12:47:11
You guess right :-) Maybe you don't see such pop-ups because you accept every cookie you're offered. I don't like this kind of cookies. This is why I don't surf sites that offer them.
Thanks a lot!
Gregor
No...I'm just a boring user. Only visit 3 or 4 sites regularly. Periodically slip into the dark-side and visit one or two more. ![]()
#595 Re: Hardware & System Configuration » [solved] No sound since uninstall of pulseaudio » 2018-08-18 12:32:50
MiyoLinux wrote:See if this will help.
...I'm not sure if it might. When I clicked the link I saw some „we value your privacy“ crap. It would be great if they'd value the mood I'm in.
Regards,
Gregor
Okay. You are in quite a mood, aren't you? I've never seen a message like you described there, and I'm not even running an adblocker right now.
Here, I will copy and paste the instructions...many thanks to mlsmith for supplying this on the MiyoLinux Wiki. It has worked for me everytime when having more than one sound card.
Multiple Sound Cards
Can't hear sound? Is the sound icon missing in the bottom panel? You likely have more than one sound card and ALSA chose the wrong one at boot. To correct this, you could create a .asoundrc file in your home directory specifying the default card. Unfortunately, Firefox does not read this file so you would continue to have no sound in Firefox. To remedy this, you will need to specify via modprobe in which order to load sound drivers so that your prefered card is selected first by ALSA.
First, run the following command to see which order ALSA assigned your cards:
cat /proc/asound/cardsIn my case I got:
0 [HDMI ]: HDA-Intel - HDA Intel HDMI
HDA Intel HDMI at 0xe0510000 irq 61
1 [PCH ]: HDA-Intel - HDA Intel PCH
HDA Intel PCH at 0xe0514000 irq 59
Now, tell the kernel to load the intel driver with 1 as the default:
sudo bash -c 'echo "options snd_hda_intel index=1,0" > /etc/modprobe.d/alsa.conf'You can verify the driver name to use above by running
lsmod | grep sndReboot the computer and you should have sound!
#596 Re: Hardware & System Configuration » [solved] No sound since uninstall of pulseaudio » 2018-08-18 12:14:53
See if this will help. ![]()
#597 Re: Hardware & System Configuration » Microcode to fight Spectre and Meltdown cpu flaws » 2018-08-16 23:47:50
deb http://gb.deb.devuan.org/merged/ ascii main
deb-src http://gb.deb.devuan.org/merged/ ascii maindeb http://gb.deb.devuan.org/merged/ ascii/non-free main
deb-src http://gb.deb.devuan.org/merged/ ascii/non-free maindeb http://gb.deb.devuan.org/merged/ ascii-backports/non-free main
deb-src http://gb.deb.devuan.org/merged/ ascii-backports/non-free maindeb http://gb.deb.devuan.org/merged/ ascii-security main
deb-src http://gb.deb.devuan.org/merged/ ascii-security maindeb http://gb.deb.devuan.org/merged/ ascii-updates main
deb-src http://gb.deb.devuan.org/merged/ ascii-updates main
Looks like I see a couple of issues with your sources.list also.
1. It appears that you have the two top lines listed twice...once with ascii main...then listed again with ascii/non-free main
2. I believe that you have extra / marks where they aren't needed. Perhaps try making this your sources.list, then try again? Remember to apt-get update if you change your sources.list.
deb http://gb.deb.devuan.org/merged/ ascii main non-free
deb-src http://gb.deb.devuan.org/merged/ ascii main non-free

deb http://gb.deb.devuan.org/merged/ ascii-backports main non-free
deb-src http://gb.deb.devuan.org/merged/ ascii-backports main non-free

deb http://gb.deb.devuan.org/merged/ ascii-security main
deb-src http://gb.deb.devuan.org/merged/ ascii-security main

deb http://gb.deb.devuan.org/merged/ ascii-updates main
deb-src http://gb.deb.devuan.org/merged/ ascii-updates main
Also, you can comment out the deb-src lines...unless you need them for building things from source.
Here is my sources.list for comparison...
deb http://deb.devuan.org/merged/ ascii main non-free contrib
#deb-src http://deb.devuan.org/merged/ ascii main non-free contrib

deb http://deb.devuan.org/merged/ ascii-security main contrib non-free
#deb-src http://deb.devuan.org/merged/ ascii-security main contrib non-free

deb http://deb.devuan.org/merged/ ascii-updates main contrib non-free
#deb-src http://deb.devuan.org/merged/ ascii-updates main contrib non-free

deb http://deb.devuan.org/merged/ ascii-backports main contrib non-free
#deb-src http://deb.devuan.org/merged/ ascii-backports main contrib non-free#598 Re: Hardware & System Configuration » Microcode to fight Spectre and Meltdown cpu flaws » 2018-08-16 23:24:59
Did you do an...
apt-get update...after adding non-free?
#599 Re: Devuan Derivatives » Miyo Awesome theme questions » 2018-08-15 08:52:24
Sorry...forgot to give the link to download the Release Notes... ![]()
#600 Re: Devuan Derivatives » Miyo Awesome theme questions » 2018-08-15 08:48:08
Did anything that I posted help? Sorry that I was in such a rush. I finally have time to try and be a little more thorough...I've been terribly busy. If I repeat myself, please forgive me.
Now, if I remember correctly, you installed Awesome on Vanilla Devuan in order to be able to do a RAID installation...then installed the Miyo-Awesome configs on top of that. If that's correct, there may be some inconsistencies in the base system; however, I don't see how that could be a factor in this case. Also, if that's correct, I'll leave a link at the end of this post so that you can download the actual Release Notes for Miyo-Awesome. I'm not sure if they will be of much help, but they might. ![]()
Regarding lxappearance and /usr/share/themes:
On Miyo-Awesome, lxappearance will only pick up GTK themes and apply them only to your applications. In the case of Awesome, lxappearance won't affect things such as window borders, the panel, etc. If lxappearance isn't showing your themes, then I can only think of two (possibly three) reasons off the top of my head. The themes aren't showing up, because...
1. the themes that are placed in /usr/share/themes haven't been marked as executable (for access) for "anyone".
2. the themes that are placed in /usr/share/themes are actually "Awesome" themes rather than GTK themes.
3. This is the questionable one...Miyo-Awesome includes the following gtk2-engines (in order to use the included themes in Miyo-Awesome)...
a) gtk2-engines-pixbuf
b) gtk2-engines-murrine
Perhaps it's possible that a theme was installed that requires a different "theme engine" ? Not sure if that would matter or not though.
I tried to cover this in the Release Notes. ![]()
Regarding lxappearance and /usr/share/awesome/themes:
Only actual "Awesome" themes should be placed in /usr/share/awesome/themes. Since lxappearance will only show GTK themes, the Awesome themes won't show up in lxappearance. To my knowledge, there is no GUI available for switching Awesome themes; it must be done manually by declaring the theme in the rc.lua file found in...
~/.config/awesome/rc.lua
If that file hasn't been modified by the user, then look for lines 46 and 47 (or thereabout)...they should look like this...
-- Available themes: miyolinux-dark, miyolinux-arc, default, sky, xresources, zenburn
beautiful.init(awful.util.get_themes_dir() .. "miyolinux-arc/theme.lua")
To change the Awesome theme, you'll need to manually edit that second line...replacing "miyolinux-arc" with the theme of your choice...exactly as it's named in /usr/share/awesome/themes/.
After editing the rc.lua, save the file, close it, and do an "Update Awesome".
Regarding the Miyo-Awesome Slim Theme/Login Screen:
As I mentioned earlier...look in /usr/share/slim and see if the miyo slim theme is in the default folder. If it's not, the only way to get it back is to reinstall it. If you've already done that, then make sure that the slim folder is also marked as executable (for access) for "anyone". Then either logout/login...or do a screen lock. It should show and be active.
If needed, it can be downloaded here...
Board footer
