You are not logged in.
- Topics: Active | Unanswered
#76 Re: Documentation » HOWTO: Install the best screen magnifier - xlupe » 2020-07-27 18:42:33
Perhaps the next time I boot into Debian but I'm enjoying my new OpenBSD box too much atm.
Here's the packaging guide I use: https://www.debian.org/doc/manuals/debmake-doc/
Thanks very much for this info. I want to get a couple more HOWTOs out before I forget what I did and then I will try out your instructions.
#77 Re: Desktop and Multimedia » xfce4-alsa-plugin now available for Debian-based systems (0.3.0-2) » 2020-07-27 14:18:11
Updated with instructions for installing wicd and removing connman
When I installed Devuan Beowulf in my laptop with the amd64 server CD, everything works fine. Except for my wifi ... . I don't mind wifi since rtl8821ae is crap anyway,
I don't have this device but the following instructions may work.
As root, add non-free contrib to your /etc/apt/sources.list file. The un-commented parts of your /etc/apt/sources.list file should look like
deb http://deb.devuan.org/merged beowulf main non-free contrib
deb-src http://deb.devuan.org/merged beowulf main non-free contrib
deb http://deb.devuan.org/merged beowulf-security main non-free contrib
deb-src http://deb.devuan.org/merged beowulf-security main non-free contrib
deb http://deb.devuan.org/merged beowulf-updates main non-free contrib
deb-src http://deb.devuan.org/merged beowulf-updates main non-free contrib
Then issue the following commands as root.
apt-get updateapt-get install firmware-realtekReboot. Devuan Beowulf does not install a graphical WiFi manager when you have no working WiFi during installation. You need to install wicd by issuing the following command as root.
apt-get install wicdSince you now have wicd network manager installed, you no longer have need for network manger connman which was installed during installation. Remove it by issuing the following commands as root.
apt-get remove connmanRemember, I do not actually have your system so follow these instructions at your own risk. You may have to re-boot for the changes to take effect. Good Luck!
#78 Re: Desktop and Multimedia » xfce4-alsa-plugin now available for Debian-based systems (0.3.0-2) » 2020-07-27 14:02:24
When I installed Devuan Beowulf in my laptop with the amd64 server CD, everything works fine. Except for my wifi and sound. I don't mind wifi since rtl8821ae is crap anyway, but sound bothered me. Turns out pulseaudio for some reason doesn't work. Thankfully alsa does, so I can configure the volume using alsamixer.
This is a known, easily correctable Beowulf bug. Please see link below for details.
https://bugs.devuan.org/cgi/bugreport.cgi?bug=276
To correct, please follow the following instructions.
As root, comment out the autospawn=no in your /etc/pulse/client.conf.d/00-disable-autospawn.conf file. My /etc/pulse/client.conf.d/00-disable-autospawn.conf file now looks like the below.
# On linux systems, disable autospawn by default
# If you are not using systemd, comment out this line
# autospawn=no#79 Re: Documentation » HOWOTO: Beowulf LXQt post installation tweeks » 2020-07-27 13:47:22
Hi
Will just mention that instead of enabling pulseaudio. Witch is software only and adding overhead and latency to your system, you can install volumeicon-alsa instead and add it to your desktop startup.
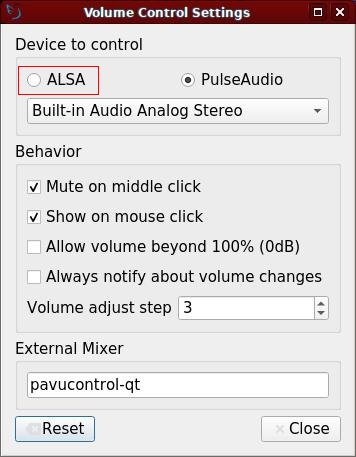
Thanks for this info. However, the LXQt volume control panel applet does not require Pulse Audio and can be configured for either ALSA or Pulse Audio without installing any additional software. Mouse Right Click on the panel volume control applet and then left click on Configure.
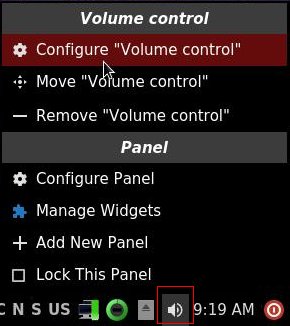
Then tick on the ALSA radio and you are done.
#80 Documentation » HOWTO: Install the best screen magnifier - xlupe » 2020-07-27 00:05:35
- Vernon
- Replies: 6
Xlupe is a screen magnifier that starts magnifying the screen as soon as it is invoked and has a slider bar to easily change magnifications. Xlupe has two modes available. In mode one, it follows the mouse and displays everything that is under it. This is the default mode. In the other mode it displays a static area. You can enter this mode by clicking into the display window and dragging the appearing rectangle to the desired region. You stop/return to mode one by pressing the right mouse button. If you have a display with different visuals and want to zoom an area in a window not laying in the default visual, you will find the "jump" option very handy. Just press the button and click on the appropriate window.
Since xlupe is not packaged, we need to build it from source at least until maybe Head_on_a_Stick graciously packages it .
Install the needed build packages
As root, issue the following command.
apt-get install build-essential libx11-dev xutils-dev xaw3dg-dev libxaw7-devGet the source code
wget https://web.archive.org/web/20070518221826/http://core.de/~coto/projects/xlupe/xlupe-1.1.tar.gzExtract the source code
tar -xvzf xlupe-1.1.tar.gzBuild the source code
cd xlupe-1.1Modify the Imakefile to build with the nicer looking 3d Athena Widgets library instead of the basic Athena Widgets.
sed -i '7s/.*/LOCAL_LIBRARIES = -lXaw3d XawClientLibs -lXmu -lXpm -lm/' ImakefileGenerate the Makefile with the following command.
xmkmfCompile and link xlupe by issuing the following command.
makeInstall xlupe on your system
mv xlupe /usr/local/bin/Add xlupe to your LXQt Desktop
The following was tested with a clean Devuan Beowulf installation with the LXQt desktop. In theory, this should work with XFCE as well. As root, use your favorite text editor to create text file /usr/share/applications/xlupe.desktop with the following contents.
[Desktop Entry]
Version=1.0
Type=Application
Name=Screen Magnifier
Exec=xlupe
Icon=system-search
Categories=Utility;
You should now have an entry named Screen Magnifier in your Accessories menu.
Thanks to the author of xlupe, Thomas Runge whose archived home page is here
#81 Re: Documentation » HOWTO: Install the best calculator for programmers - ycalc » 2020-07-26 13:23:18
I've built versions for stable, testing & unstable in various architectures:
https://software.opensuse.org//download … =ycalc-mob
They were built in Debian containers but should be fully compatible with Devuan, probably best to just grab the .deb package and install that — the software is ancient and unlikely to be updated.
Thanks for doing this. The only packages I know how to make are for Slackware.
#82 Documentation » HOWTO: Install the best calculator for programmers - ycalc » 2020-07-25 20:56:12
- Vernon
- Replies: 2
Ycalc is a light-weight programmable calculator for X based on the TI-58/59 which allows you to create keypress macros. An example of how to program ycalc is here. But what really sets ycalc apart is its binary mode. When you press the Bin key, a window appears with three rows of binary numbers where you can toggle bits, shift bits and perform logical operations such as Xor (exclusive or).
Since Ycalc is not packaged, we need to build it from source.
Install the needed build packages
As root, issue the following command.
apt-get install build-essential libx11-devGet the source code
wget http://pet.orbin.se/ycalc-mob-1.09.1-src.tar.gz Extract the source code
tar -xvzf ycalc-mob-1.09.1-src.tar.gz Build the source code
cd ycalc-mob-1.09.1-srcmakeRun ycalc
./ycalc-mobChange ycalc size
Ycalc was written at a time when high resolution displays were 640x480. As such, ycalc may appear too small for you. To make ycalc larger, issue the following commands.
sed -i '225s/.*/#define DEFAULTFONT "9x15"/' main.cmakeRun ycalc again and ./ycalc-mob to see if you like the size better. If not, repeat the last two steps with a different fond size.
To get a list of possible fonts and font sizes, issue the following command.
xlsfonts | grep '^[6-9]x'Install ycalc on your system
As root, issue the follow commands
cp ycalc-mob /usr/local/bin/ycalcmkdir /usr/local/man/man1gzip -c ycalc-mob.1 > /usr/local/man/man1/ycalc.1.gzAdd ycalc to your LXQt Desktop
The following was tested with a clean Devuan Beowulf installation with the LXQt desktop. In theory, this should work with XFCE as well. As root, use your favorite text editor to create text file /usr/share/applications/ycalc.desktop with the following contents.
[Desktop Entry]
Version=1.0
Type=Application
Name=Calculator
Exec=ycalc
Icon=accessories-calculator
Categories=Utility;Calculator
You should now have an entry named Calculator in your Accesories menu.
#83 Re: DIY » Howwww... aaaabout some Dev1 backgrounds, hey? » 2020-07-25 05:05:30
Mind if I join the party?
To be explicit, with the exception of the Devuan logo (obviously), the images are created from scratch and are both released into the public domain. Credit would be nice but is not mandatory.
Devuan plasma theme:
https://i.imgur.com/azPgZMF.jpg
Feedback appreciated.
Love this image. Use it as my wallpaper. Thanks!!
#84 Re: Documentation » Install music player daemon and set up it as a user service in Devuan » 2020-07-24 20:37:08
This short guide describes how to install mpd as a user service in Devuan 2.1 (ascii).
Install mpd and mpc#apt install mpd mpcMpc is a command line user interface for MPD server.
My favorite front end for MPD is YMPD. https://www.ympd.org/
Written in C
Very Lightweight and extremely fast
Built in Web server - no external web server neede
Uses HTM5 and WebSockets
Have MPD and YMPD installed on a couple of PI Zeros. One PI Zero with a 5 dollar USB Sound card is connected to an original Bose Wave Radio and the other is connected to my Biuetooth Speaker.
I have built is on Raspbian so it should build fine on Devuan as well.
#85 Documentation » HOWOTO: Beowulf Connect to your VPN provider with openvpn » 2020-07-24 18:14:29
- Vernon
- Replies: 2
August 1, 2020
Updated with instructions for freevpn.me, a free, no-signup vpn provider that allows all traffic.
Many VPN providers have support for openvpn. VPN providers 'usually have a separate .ovpn file for each individual server. Some frequently change their keys, passwords and certificates. As a result, it is easier to invoke openvpn from the command line rather than loading and unloading .ovpn configurations into a network manager.
Install openvpn and resolvconf packages
Become root using the following command.
su -Note the dash at the end of the su command. This is required because we will be running tools from the sbin directories.
Install openvpn and resolvconf packages using the following command.
apt-get install openvpn resolvconfSince we want to invoke openvpn from the command line, we don't want openvpn running a daemon. To accomplish this, issue the following commands.
/etc/init.d/openvpn stopupdate-rc.d openvpn disableDownload and extract the VPN bundle from freevpn.me
wget https://freevpnme.b-cdn.net/FreeVPN.me-OpenVPN-Bundle-July-2020.zipunzip FreeVPN.me-OpenVPN-Bundle-July-2020.zipModify freevpn.me .ovpn files to prevent DNS leakage
cd FreeVPN.me-OpenVPN-Bundle-July-2020/FreeVPN.me\ -\ Server1-NLAdd the following lines to each .ovpn file to prevent DNS leakage.
script-security 2
up /etc/openvpn/update-resolv-conf
down /etc/openvpn/update-resolv-conf
Instead of adding manually, you can use the following script below.
#!/bin/bash

for i in *.ovpn
do
sed -i "/auth-user-pass/a script-security 2\\
up /etc/openvpn/update-resolv-conf\\
down /etc/openvpn/update-resolv-conf" $i
done
Run openvpn
For example, If you want to connect to the freevpn.me VPN server over TCP at port 443, invoke openvpn as root with the following command.
openvpn Server1-TCP443.ovpnEnter the username and password when prompted from the freevpn.me web site here
To stop openvpn, press the Ctrl+c keys simultaneously.
Test your VPN connection
Go to https://www.dnsleaktest.com/
Make sure that this web page is reporting your VPN provider's IP address and not your Internet Service Provider's IP address.
Click on Standard Test
.
Make sure that the IP addresses reported are from your VPN provider and not from your Internet Service Provider'.
Corrections and Comments are welcome.
#86 Devuan » Thanks Devuan Developers » 2020-07-21 16:19:21
- Vernon
- Replies: 5
I installed Devuan with LXQt after Fedora dropped i386 support. I opted for Fedora since it had the latest kernel with a bluetooth driver for my netbook. However, I found out to my dismay that my netbook Bluetooth doesn't support Low Energy which means I couldn't connect to my mouse which required it. I have now installed Devuan and am overjoyed with the over 2 times reduction in boot up time and snappier performance versus bloated Fedora, Thanks very much Devuan developers!
#87 Documentation » HOWOTO: Beowulf LXQt post installation tweeks » 2020-07-21 15:58:31
- Vernon
- Replies: 11
After installing Beowulf with LXQt desktop, I had to do the following tweaks. Besides the installation of LXQt, I believe I accepted all the other default options including sysvinit and xfce4 window manager. If you have installed a different init or window manager, this HOWTO may not apply to you.
Pulse Audio
As root, comment out the autospawn=no in your /etc/pulse/client.conf.d/00-disable-autospawn.conf file. My /etc/pulse/client.conf.d/00-disable-autospawn.conf file now looks like the below.
# On linux systems, disable autospawn by default
# If you are not using systemd, comment out this line
# autospawn=no
Control+A+d Show Desktop Warning Message
The LXQt Show Desktop keyboard shortcut conflicts with the xfce4 window manager keyboard shortcut resulting in a warning message every time you log in. To get rid of the message, Comment out the the following line
<property name="<Primary><Alt>d" type="string" value="show_desktop_key"/>in your ~/.config/xfce4/xfconf/xfce-perchannel-xml/xfce4-keyboard-shortcuts.xml file.
Moving Windows
On a small display like a netbook, some non-scrollable windows may extend beyond the bottom of the screen. To view the bottom of these windows, press the Alt+Left Mouse Butoon while moving your mouse or track pad. This will allow you to grab and move anywhere on a window which allows you to move a window beyond the top of the screen so you can see and click on any bottom buttons..
#88 Re: Hardware & System Configuration » BCM4312 on a old Acer AO751h » 2020-07-21 01:44:46
Did you installed b43-fwcutter firmware-b43-installer packages?
No. is this a better performance option than the broadcom-sta-dkms package?
#89 Re: Hardware & System Configuration » BCM4312 on a old Acer AO751h » 2020-07-19 19:13:22
Updated 07/23/2020 to account for Devuan Beowulf installation of network manager connman.
This is what worked for me with my Dell Vostro A90 netbook BCM4312 WiFi and LXQt.
First, I added non-free contrib to your /etc/apt/sources.list file. My un-commented parts of my /etc/apt/sources.list file look like
deb http://deb.devuan.org/merged beowulf main non-free contrib
deb-src http://deb.devuan.org/merged beowulf main non-free contrib
deb http://deb.devuan.org/merged beowulf-security main non-free contrib
deb-src http://deb.devuan.org/merged beowulf-security main non-free contrib
deb http://deb.devuan.org/merged beowulf-updates main non-free contrib
deb-src http://deb.devuan.org/merged beowulf-updates main non-free contrib
Then I issued the following commands as root.
apt-get updateapt-get install linux-image-$(uname -r|sed 's,[^-]*-[^-]*-,,') linux-headers-$(uname -r|sed 's,[^-]*-[^-]*-,,') broadcom-sta-dkmsReboot. Devuan did not install a graphical WiFi manager I assume because I had no working WiFi during installation. I chose to install wicd by issuing the following command as root.
apt-get install wicdSince we now have wicd network manager installed, we no loger have need for network manger connman which was installed during installation. Remove it by issuing the following commands as root.
apt-get remove connman
apt-get purge connman
Finally, I commented out the line referencing the eth0 device in my /etc/network/interfaces files in order stop the boot process from pausing when there is no Ethernet cable connected. My /etc/network/interfaces file now looks like this.
# This file describes the network interfaces available on your system
# and how to activate them. For more information, see interfaces(5).

source /etc/network/interfaces.d/*

# The loopback network interface
auto lo
iface lo inet loopback

# The primary network interface
# allow-hotplug eth0
# iface eth0 inet dhcpBoard footer
