
You are not logged in.
- Topics: Active | Unanswered
Pages: 1
#1 Documentation » [HowTo] Create a Service Script for sysvinit » 2026-05-30 03:14:01
- joser
- Replies: 1
A very common issue with server applications made for systemd is that when are ported to sysvinit they lack the service script file, I will cover the easiest way to create it, this example can be used as a template for any daemon.
# Create init file, in this case I will use ntfy as example to show how to create the service file with real binary name, run by specific user, arguments, pid and log paths.
sudo nano /etc/init.d/ntfy#!/bin/sh
### BEGIN INIT INFO
# Provides: ntfy
# Required-Start: $network $syslog
# Required-Stop: $network $syslog
# Default-Start: 2 3 4 5
# Default-Stop: 0 1 6
# Short-Description: ntfy notification server
# Description: Start/Stop/Restart ntfy notification server
### END INIT INFO
NAME="ntfy"
DESC="ntfy notification server instance"
DAEMON="/usr/bin/ntfy"
DAEMON_ARGS="serve --config /etc/ntfy/server.yml"
PIDFILE="/var/run/$NAME.pid"
LOGFILE="/var/log/$NAME.log"
USER="ntfy"
#DEBUG:
exec 1>>$LOGFILE 2>&1
set -x
# Ensure daemon binary exists or exits with error code 2 (No such file or directory)
[ -x "$DAEMON" ] || exit 2
do_start() {
echo "Starting $DESC..."
# Use start-stop-daemon to run as specified user
start-stop-daemon --start --quiet --background --make-pidfile \
--pidfile "$PIDFILE" --chuid "$USER" \
--exec "$DAEMON" -- $DAEMON_ARGS
}
do_stop() {
echo "Stopping $DESC..."
start-stop-daemon --stop --quiet --pidfile "$PIDFILE" --retry=TERM/30/KILL/5
rm -f "$PIDFILE"
}
do_status() {
if [ -f "$PIDFILE" ]; then
PID=$(cat "$PIDFILE")
if kill -0 "$PID" 2>/dev/null; then
echo "$DESC is running (PID $PID)."
else
echo "$DESC is dead but pid file exists."
fi
else
echo "$DESC is not running."
fi
}
do_reload() {
echo "Reloading $DESC..."
if [ -f "$PIDFILE" ]; then
kill -HUP $(cat "$PIDFILE")
else
echo "No pid file found, cannot reload."
fi
}
case "$1" in
start)
do_start
;;
stop)
do_stop
;;
restart|force-reload)
do_stop
sleep 1
do_start
;;
status)
do_status
;;
reload)
do_reload
;;
*)
echo "Usage: $0 {start|stop|restart|force-reload|status|reload}" >&2
exit 1
;;
esac
exit 0
# Some daemons automatically create a logfile following the same path and name that we specify with the LOGFILE variable,
# if so then this setting can be redundant, but in this case we need to specify that value to be able to debug and know where to look for.
# Make it executable
sudo chmox +x /etc/init.d/ntfy# Activate the service auto start
sudo update-rc.d ntfy defaults# Test the service file
sudo service ntfy# Remember you wont see anything on the screen because the #DEBUG: lines all outputs are send to the log file, instead use cat:
cat /var/log/ntfy.log# Since is the first ever output then you will see the content as:
Usage: /etc/init.d/ntfy {start|stop|restart|force-reload|status|reload}# That means the service is ready to work, now test the status:
sudo service ntfy status# Again, you wont see anything on the screen because the output went to the log file, so again use cat:
cat /var/log/ntfy.log# You should see the last/second line as:
ntfy push notification server is not running.# Now it's time to start it:
sudo service ntfy start# To verify it's status again then enter:
sudo service ntfy status# Use cat to see the actual output:
cat /var/log/ntfy.log# Now you should get the output as:
ntfy push notification server is running (PID 1758).# In that case the ntfy service it's running perfectly fine so you can edit the service file to comment the 2 lines after #DEBUG: to get the service script outputs on the terminal.
# Please remember this is just an example how to easily create a service script, and in the case of ntfy, the success or fail to start depends on
# the settings from: "/etc/ntfy/server.yml"
# What I'm trying to emphasise is that if the script works with the "status" argument then the "start" argument also works.
# But the success or fail for the start argument will depend only on any required/missing setting that must be passed to the deamon when starts.
# So this is not a copy & paste solution but a very solid start point to create and test any missing service script until you make it work.
#2 Documentation » [HowTo] Protect from SHH brute force attacks with fail2ban » 2026-04-25 02:06:37
- joser
- Replies: 0
An SSH brute force attack is a hacking technique where attackers use automated tools to systematically try thousands of username and password combinations to gain unauthorized access to a remote server via the Secure Shell (SSH) protocol.
To be fair this is not a definitive protection but another countermeasure to reduce drastically the risks from such attacks when using public IPs.
# As a complementary measure you should NOT allow ssh root login using password but using ssh key in worst case escenario, to do that change the settings for sshd:
sudo nano /etc/ssh/sshd_config# Uncomment the #PermitRootLogin line like:
PermitRootLogin prohibit-password
# Install packages:
sudo apt install -y fail2ban lnav python3-pyinotify# Verify connection attemps
sudo lnav /var/log/auth.log# You will see very often lines like:
<date> - <time> <hostname> sshd[pid]: Failed password for root from xxx.xxx.xxx.xxx port xxxx ssh2 <--- Brute force attack
# and also when you connect you will see a line like this:
<date> - <time> <hostname> sshd[pid]: Accepted publikey for <youruser> from <your.isp.public.ip> port xxxxx ssh2: EDxxxx <--- If you are using ssh keys instead of password this is you.
<date> - <time> <hostname> sshd-session[pid]: Accepted password for <youruser> from <your.isp.public.ip> port 39284 ssh2 <--- Or if you still using password authentication.
# We will whitelist this IP <your.isp.public.ip> just in case since we will use a very strict ban criteria/time.
# Press q to exit
# Create Local Configuration to preserve settings during updates.
sudo nano /etc/fail2ban/jail.local# Configure SSH Protection, we will use 3 attemps to block earlier than 5 attemps and for 3 hours but later you can increase the bantime if you notice the same IP addresses repeating again and again:
[DEFAULT]
# Whitelist your own IP address (space-separated)
ignoreip = 127.0.0.1/8 ::1 <your.isp.public.ip>
[sshd]
backend = auto
enabled = true
maxretry = 3
bantime = 3h
findtime = 10m
# Restart fail2ban service
sudo service fail2ban restart# Verify ssh jail status
sudo fail2ban-client status sshd
# You will see something like:
Status for the jail: sshd
|- Filter
|  |- Currently failed:	1
|  |- Total failed:	5
|  `- File list:	/var/log/auth.log
`- Actions
   |- Currently banned:	6
   |- Total banned:	6
   `- Banned IP list:	2.57.122.189 2.57.122.192 45.148.10.147 45.148.10.151 45.148.10.157 92.118.39.236
# Now if you verify connection attemps again
sudo lnav /var/log/auth.log
You will notice the attemps wont repeat from the same IP since the moment fail2ban was restarted, keep it running and eventually they will realize is not worthy to keep trying or they will run out of public IPS or you can also increase the time if the same IP address keep showing up.
To add an extra layer of protection you can also enable 2FA with oathtool to make ssh ask for 6 digits code before you can enter any password, that way the attack never even begins since the client gets disconnected and banned when doens't provide a valid 6 digits code to begin with the login attemp, link to guide below.
[HowTo] 2FA TOTPs for SSH without google-authenticator.
Edited on April-29-2026, steps above tested on Devuan 5, but for Devuan 6 these 2 changes below are required:
Added package to install: python3-pyinotify
Added: backend = auto
#3 Re: Documentation » [HowTo] Install Gitea on Devuan 5 » 2026-04-06 19:35:05
Glad to hear that ovi, I just posted a newer how-to for Forgejo using self cert, if you wanna give a try the link it's bellow, cheers.
#4 Documentation » [HowTo] Install Forgejo with self signed cert on Devuan 6 » 2026-04-06 19:05:49
- joser
- Replies: 0
Forgejo, an alternative to Gitea.
https://forgejo.org
Kernel version: 6.12.48+deb13-amd64
Binary file: forgejo-13.0.3-linux-amd64
Partition scheme: / 12%, swap 12%, /home -1
Does these matters? I don't know but I have tried this steps only on systems having exactly the same specs like above, so if you get any error message related for example to swap memory and you have no swap then I won't know what to tell you but create a swap partition and try again.
# First, make sure the domain/host name on /etc/hosts it's like: IP <FQDN> <hostname>, for example for a local domain /etc/hosts should be like:
127.0.0.1 localhost
192.168.1.10 myhost.mydomain.home myhost
# Where 192.168.1.10 is the local network IP for your local forgejo host, to verify it then execute:
hostname -f# The result should be for example:
myhost.mydomain.home
# This is a must since later we will use the variables FQDN and HOSTNAME to retreive those values automatically
# to generate the self signed cert and to avoid mistyping errors that could make the setup completely fail.
# Install dependencies
sudo apt install -y git git-lfs nginx openssl# Download and install binary
wget https://codeberg.org/forgejo/forgejo/releases/download/v13.0.3/forgejo-13.0.3-linux-amd64
chmod +x forgejo-13.0.3-linux-amd64
sudo cp forgejo-13.0.3-linux-amd64 /usr/local/bin/forgejo
sudo chmod 755 /usr/local/bin/forgejo
# Create git user on the system. Forgejo will run as that user, and when accessing git through
# SSH (which is the default), this user is part of the URL (for example
# in: git clone git@git.example.com:YourOrg/YourRepo.git the "git" at the left of @ is the user you’ll create now).
sudo adduser --system --shell /bin/bash --gecos 'Git Version Control' \
  --group --disabled-password --home /home/git git
# Create the directory where Forgejo’s config, called app.ini it's stored in. Initially it needs to be writable by Forgejo,
# but after the installation you can make it read-only even for Forgejo because then it shouldn’t modify it anymore.
sudo mkdir -p /etc/forgejo/{ssl}
sudo chown -R root:git /etc/forgejo && sudo chmod -R 770 /etc/forgejo
# In this case, below will use the path "/home/git/" where Forgejo will store its data, including your repositories,
# this in order to make it easier to preserve and backup when ussing separated /home partition and SQLite database,
# but that value can be modified to anything that suits best for you if you know what are you doing.
# Create Forgejo service file, copy and paste from #!/bin/sh line to "exit 0" line and save.
sudo nano /etc/init.d/forgejo#!/bin/sh
### BEGIN INIT INFO
# Provides: forgejo
# Required-Start: $remote_fs $network $syslog
# Required-Stop: $remote_fs $network $syslog
# Should-Start: $local_fs
# Should-Stop: $local_fs
# Default-Start: 2 3 4 5
# Default-Stop: 0 1 6
# Short-Description: Forgejo Git server daemon
# Description: Starts, stops, and manages the Forgejo service.
### END INIT INFO
# Where Forgejo lives (binary, config, data)
FORGEJO_ROOT="/home/git/lib/forgejo"
FORGEJO_BINARY="/usr/local/bin/forgejo"
FORGEJO_WORK_DIR="/home/git/lib/forgejo"
FORGEJO_USER="git"
FORGEJO_GROUP="git"
# Config file
FORGEJO_CONFIG="/etc/forgejo/app.ini"
# Log files – same locations used by the systemd unit
FORGEJO_LOG_DIR="${FORGEJO_ROOT}/log"
STDOUT_LOG="${FORGEJO_LOG_DIR}/stdout.log"
STDERR_LOG="${FORGEJO_LOG_DIR}/stderr.log"
# PID file – used for status checks and clean shutdowns
PIDFILE="/var/run/forgejo.pid"
# Extra flags you might want to pass (e.g., --config)
DAEMON_OPTS="web --config ${FORGEJO_CONFIG}"
log_msg() {
echo "[forgejo] $*"
}
# Ensure the binary exists before we try anything
[ -x "${FORGEJO_BINARY}" ] || {
log_msg "Executable not found at ${FORGEJO_BINARY}. Aborting."
exit 1
}
# Create log directory if missing
[ -d "${FORGEJO_LOG_DIR}" ] || mkdir -p "${FORGEJO_LOG_DIR}"
chown ${FORGEJO_USER}:${FORGEJO_GROUP} "${FORGEJO_LOG_DIR}"
do_start() {
log_msg "Starting Forgejo…"
# Run as the dedicated user, detach, and capture PID
start-stop-daemon --start \
--quiet \
--background \
--make-pidfile \
--pidfile "${PIDFILE}" \
--chuid "${FORGEJO_USER}:${FORGEJO_GROUP}" \
--exec "${FORGEJO_BINARY}" \
-- ${DAEMON_OPTS} >>"${STDOUT_LOG}" 2>>"${STDERR_LOG}"
RET=$?
[ $RET -eq 0 ] && log_msg "Forgejo started (PID $(cat ${PIDFILE}))"
return $RET
}
do_stop() {
log_msg "Stopping Forgejo…"
if [ -f "${PIDFILE}" ]; then
PID=$(cat "${PIDFILE}")
start-stop-daemon --stop --quiet --pid "${PID}" --retry=TERM/30/KILL/5
RET=$?
[ $RET -eq 0 ] && rm -f "${PIDFILE}" && log_msg "Forgejo stopped"
else
log_msg "No PID file found – is Forgejo already stopped?"
RET=1
fi
return $RET
}
do_restart() {
do_stop && do_start
}
do_status() {
if [ -f "${PIDFILE}" ]; then
PID=$(cat "${PIDFILE}")
if kill -0 "$PID" 2>/dev/null; then
echo "Forgejo is running (PID $PID)"
return 0
else
echo "Forgejo PID file exists but process is dead"
return 1
fi
else
echo "Forgejo is not running"
return 3
fi
}
case "$1" in
start)
do_start
;;
stop)
do_stop
;;
restart|force-reload)
do_restart
;;
status)
do_status
;;
*)
echo "Usage: $0 {start|stop|restart|status}"
exit 2
;;
esac
exit 0
# Make it executable
sudo chmod +x /etc/init.d/forgejo# Enable the service auto-start at boot
sudo update-rc.d forgejo defaults# Generate self signed cert and key
sudo openssl genrsa -out /etc/nginx/ssl/$(hostname).key 4096
sudo openssl req -x509 -new -nodes -key /etc/nginx/ssl/$(hostname).key -sha256 -days 365 -subj "/CN=$(hostname -f)" -reqexts v3_req -extensions v3_ca -out /etc/nginx/ssl/$(hostname).crt
# Change cert and key group permissions but maintaining root ownership
sudo chgrp git /etc/nginx/ssl/$(hostname).crt
sudo chmod 644 /etc/nginx/ssl/$(hostname).crt
sudo chgrp git /etc/nginx/ssl/$(hostname).key
sudo chmod 600 /etc/nginx/ssl/$(hostname).key
# Prevent git error: server verification failed: certificate signer not trusted for your local repo/server
git config --global http."https://$(hostname -f)/".sslCAInfo /etc/nginx/ssl/$(hostname).crt# Copy the new certificate system wide (optional):
sudo cp /etc/nginx/ssl/$(hostname).crt /usr/local/share/ca-certificates/
sudo update-ca-certificates
# To prevent error: RPC failed; HTTP 413 curl 22 The requested URL returned error: 413
sudo nano /etc/nginx/nginx.conf# Add this line inside the "http {" block
# To prevent error: RPC failed; HTTP 413 curl 22 The requested URL returned error: 41
client_max_body_size 500M; # Increase limit from default 1MB to 500M
# Create the initial forgejo settings: copy, paste and enter (to pass the hostname values).
sudo tee /etc/forgejo/app.ini > /dev/null <<'EOF'
[server]
PROTOCOL                   = http
DOMAIN                     = $(hostname -d)
ROOT_URL                   = https://$(hostname -f)
APP_DATA_PATH              = /home/git/data
LOCAL_ROOT_URL             =

[session]
COOKIE_SECURE              = true
EOF
# Change /etc/forgejo/app.ini ownership
sudo chown git:git /etc/forgejo/app.ini
sudo chmod 644 /etc/forgejo/app.ini
# Create the NGINX site configuration: copy, paste, press enter.
sudo tee /etc/nginx/sites-available/forgejo.conf > /dev/null <<'EOF'
# --------------------------------------------------------------
# HTTP → HTTPS redirect (listen on port 80)
# --------------------------------------------------------------
server {
    listen 80;
    listen [::]:80;
    server_name $(hostname -f);

    # Redirect every request to the same URL but with https
    return 301 https://$host$request_uri;
}

# --------------------------------------------------------------
# TLS termination + reverse‑proxy to Forgejo (listen on 443)
# --------------------------------------------------------------
server {
    listen 443 ssl;
    listen [::]:443 ssl;
    http2 on;
    server_name $(hostname -f);

    # ----- TLS certificates -----
    ssl_certificate     /etc/nginx/ssl/$(hostname).crt;
    ssl_certificate_key /etc/nginx/ssl/$(hostname).key;

    # ----- Recommended SSL settings (Mozilla intermediate profile) -----
    ssl_protocols       TLSv1.2 TLSv1.3;
    ssl_ciphers         HIGH:!aNULL:!MD5;
    ssl_prefer_server_ciphers on;
    ssl_session_timeout 1d;
    ssl_session_cache   shared:SSL:10m;

    # ----- HSTS (force browsers to stay on HTTPS) -----
    add_header Strict-Transport-Security "max-age=31536000; includeSubDomains; preload" always;

    # ----- Proxy settings -----
    location / {
        # Forgejo runs internally on HTTP port 3000 (unchanged)
        proxy_pass http://127.0.0.1:3000;

        # Preserve original host and scheme for Forgejo’s own link generation
        proxy_set_header Host $host;
        proxy_set_header X-Real-IP $remote_addr;
        proxy_set_header X-Forwarded-For $proxy_add_x_forwarded_for;
        proxy_set_header X-Forwarded-Proto $scheme;

        # Optional: increase timeout for large git pushes
        proxy_read_timeout 300s;
        proxy_send_timeout 300s;
    }

    # ----- Optional: static assets cache (speed up UI) -----
    location ~* \.(css|js|png|jpg|jpeg|svg|ico|woff2?)$ {
        expires 30d;
        add_header Cache-Control "public, immutable";
        try_files $uri @forgejo;
    }

    # Fallback to the main proxy block if the static file isn’t found
    location @forgejo {
        proxy_pass http://127.0.0.1:3000;
    }
}
EOF
# Enable the site & test the NGINX config
sudo ln -sf /etc/nginx/sites-available/forgejo.conf /etc/nginx/sites-enabled/# Test syntax (very important!)
sudo nginx -t# You should see:
nginx: the configuration file /etc/nginx/nginx.conf syntax is ok
nginx: configuration file /etc/nginx/nginx.conf test is successful
# Open firewall ports (if applicable)
# If you have ufw, firewalld, or a cloud‑provider security group, allow only 80 and 443 inbound:
# UFW example
sudo ufw allow 80/tcp
sudo ufw allow 443/tcp
# (Optionally deny direct access to 3000 from outside)
sudo ufw deny 3000/tcp# For firewalld:
sudo firewall-cmd --add-service=http --permanent
sudo firewall-cmd --add-service=https --permanent
sudo firewall-cmd --remove-port=3000/tcp --permanent   # optional
sudo firewall-cmd --reload
# Start both services
sudo service forgejo start
sudo service nginx start
# Finally, open your browser and go to http://<FQDN_here> to finish the setup.
# Yes, of course you will get the warning of self signed cert but other than that everything will work as intended.
#5 Documentation » [HowTo] 2FA TOTPs for SSH without google-authenticator. » 2025-12-09 00:13:34
- joser
- Replies: 0
2FA TOTPs
##On server side ### you can execute these via SSH as well.
#Install the required packages for TOTPs:
sudo apt install -y oathtool libpam-oath qrencode keyutils#Make a backup copy of /etc/ssh/sshd_config
sudo cp /etc/ssh/sshd_config /etc/ssh/sshd_config~#Update the SSH daemon configuration in /etc/ssh/sshd_config
sudo nano /etc/ssh/sshd_config# Make sure this options are enabled
ChallengeResponseAuthentication yes
KbdInteractiveAuthentication yes
UsePAM yes
#Generate a secure hex secret key for the current user using sha256sum and store it in keyctl to keep the key_id as variable only:
KEY_ID=$(keyctl add user hex_secret $(head -15 /dev/urandom | sha256sum | cut -b 1-30) @s)
#Add the secret to the /etc/users.oath file without actually echoing it:
echo "HOTP/T30/6 $USER - $(keyctl pipe $KEY_ID)" | sudo tee -a /etc/users.oath > /dev/null
#File /etc/users.oath must be readable and writable only by root to maintain security.
sudo chmod 600 /etc/users.oath
# Generate a QR code for the user’s authenticator app:
TKNTITLE="Your token title here"BASE32_SECRET=$(oathtool --verbose --totp "$(keyctl pipe $KEY_ID)" --digits=6 -w 1 | grep Base32 | cut -d ' ' -f 3)qrencode --type=ANSIUTF8 "otpauth://totp/$TKNTITLE:$USER@$HOSTNAME?secret=$BASE32_SECRET&issuer=$TKNTITLE&digits=6"#Scan the previous QR code with your Authenticator app.
#Configure PAM to use pam_oath.
sudo nano /etc/pam.d/sshd#add the following two lines at the top of the file, before the @include common-auth line:
# TOTPs config
auth requisite pam_oath.so usersfile=/etc/users.oath window=20 digits=6
#Restart the SSH service to apply changes:
sudo service ssh restart && exit# At this point your user can log in via SSH using a dynamically generated OTP from your authenticator app.
# Please notice this wont work from any workstations that you have SSH password-less authentication since the purpose for this guide is mostly to prevent brute force password attacks.
Now from you will have to enter an OTP (Authenticator app) and your user password after, the ssh login screen it will look like:
(user@XX.XXX.X.XXX) One-time password (OATH) for `user':(user@XX.XXX.X.XXX) Password:# To disable the OTP auth then make the new /etc/ssh/sshd_config as backup, restore the original file and restart ssh service
sudo cp /etc/ssh/sshd_config /etc/ssh/sshd_config-2fasudo cp /etc/ssh/sshd_config~ /etc/ssh/sshd_configsudo service ssh restart# This way you can switch back and fourt if you need.
# Finally lets create a passwordless key based authentication for SSH from your workstation(s) as plan B.
Password-less key based authentication
## On client/workstation side ##
# Create a new ssh key with Ed25519
ssh-keygen -t ed25519 -a 100 -f ~/.ssh/id_ed25519 -C "$USER@$HOSTNAME-$(date +%F)"#Enter the same password that you have for your user, this will keep things easier
# Copy the new ssh key to server
ssh-copy-id -i ~/.ssh/id_ed25519.pub $USER@<SERVER_NAME/IP># This copied the user key to the file ~/.ssh/authorized_keys on server, in other words, to remove password-less authentication for this server then on the same server:
rm ~/.ssh/authorized_keys# Now you can connect like "ssh <SERVER_NAME/IP>" and wont be asked to enter a password or even a 2FA,
# this simply to avoid having to use the Authenticator app every time from your own trusted workstations.
# or in worst case scenario, if for any reason you can't use your phone or usb key at the moment.
# You can have as many client/workstation keys as you want, just make sure you keep your username as constant.
Tested with Devuan 6 (Excalibur) but it should work the same with previous versions.
#6 Documentation » [HowTo] Replace multi-user/server mode login screen with a btop screen » 2025-12-01 01:17:04
- joser
- Replies: 0
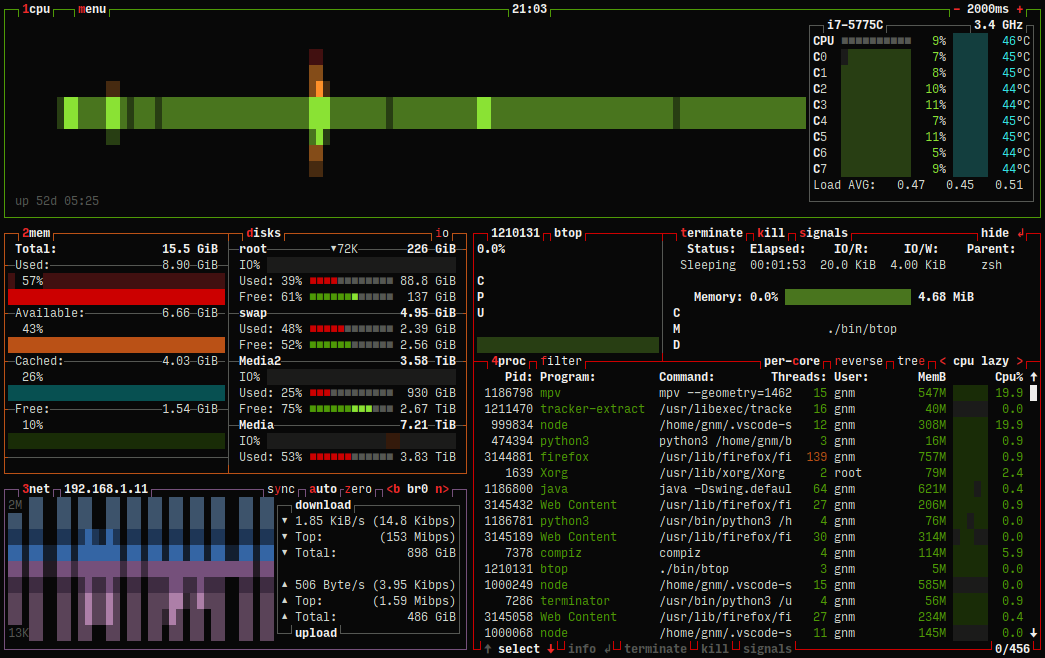
Sample image rights to https://github.com/aristocratos/btop
Please notice this setting should be used only for personal or lab environments where physical access is controlled, as it does not provide strong security and is not recommended for production systems.
#Install btop
sudo apt install -y btop#To create a restricted user account for running btop. Use a restricted shell like rbash to limit capabilities and prevent access to sensitive system functions. The account should not have a password and should be locked to prevent direct login.
sudo useradd -s /bin/rbash -M btopusrsudo usermod -L btopusrsudo mkdir -p /home/btopusr/{.config/btop}#To create a .profile script in the user's home directory to automatically start btop, select and copy all the lines below to EOF, paste them in terminal and press Enter.
sudo tee /home/btopusr/.profile > /dev/null << 'EOF'
btop --tty_off --low-color
exit
EOF
# Change /home/btopusr/ folder ownership.
sudo chown -R btopusr /home/btopusr/# Edit tty1 service.
sudo nano /etc/inittab# Find the next line, # comment it and insert new line next to it, it will look as follows.
#1:2345:respawn:/sbin/getty --noclear 38400 tty1
1:2345:respawn:/sbin/agetty --autologin btopusr 38400 tty1
# Reboot to apply changes.
sudo rebootAfter rebooting, the console will display btop instead of the login prompt. Pressing Ctrl+Alt+F2 through F6 will provide access to standard login prompts on other virtual terminals, preserving access for administrative tasks.
# To revert it then just change /etc/inittab to its original setting for the line and comment the one that you added.
1:2345:respawn:/sbin/getty --noclear 38400 tty1
#1:2345:respawn:/sbin/agetty --autologin btopusr 38400 tty1
Tested on Devuan 6 (Excalibur) but it should work the same with previous version or any other system using SysVinit or adapt it accordingly for OpenRC.
#7 Documentation » [HowTo] Fix Synaptic Package Manager not opening » 2025-06-02 01:33:39
- joser
- Replies: 0
#Symptom: It just exits without any error message right after enter your password.
#Execute to verify the issue:
exo-open /usr/share/applications/synaptic.desktop
#Result should be:
Authorization required, but no authorization protocol specified
Failed to initialize GTK.
Probably you're running Synaptic on Wayland with root permission.
Please restart your session without Wayland, or run Synaptic without root permission
#Then Solution is:
rm .Xauthority
touch .Xauthority
chmod 600 .Xauthority
xauth generate $DISPLAY . trusted
#8 Documentation » K3S install script for SysVinit » 2025-05-21 22:34:58
- joser
- Replies: 0
K3S v1.32.5+k3s1 tested on Devuan 5 arm64 and amd64
It works the same as the original script, performs the installation (server/controller or worker/agent node) creates the service and creates uninstall script.
This script should work with Systemd systems or any other SysVinit Debian based distro as well, but I never tried, I kept the Systemd parts in order to make it easier for me to mod it focusing only on what I need change to make it work with SysVinit, if someone else wants to improve this script then please do so.
All the K3S_* environment variables are accepted. you can use them if applicable, the script will run in local mode so the environment variables must be indicated before the install script file as the examples below.
Main server/controller install:
K3S_TOKEN="MySecr3tT0k3n" K3S_ROLE=server FINAL_EXEC_OPTIONS="--cluster-init --bind-address 192.168.1.xxx --write-kubeconfig-mode 644" ./k3s-sysvinit-install.sh
#This will install K3S as server/controller, listen to the address 192.168.1.xxx only (useful when you have more than one IP addresses), will write the config in mode 644 and will use the specified token to create a cluster.
Second server/controller install:
K3S_TOKEN="MySecr3tT0k3n" K3S_ROLE=server FINAL_EXEC_OPTIONS="--server https://192.168.1.xxx:6443 --write-kubeconfig-mode 644" ./k3s-sysvinit-install.sh
#This will install a second (third, etc.) server/controller, will write the config in mode 644 and will use the specified token to join an existing cluster on 192.168.1.xxx
#Server Service:
sudo service k3s status/start/stop/restart
Worker node install:
K3S_TOKEN="MySecr3tT0k3n" K3S_ROLE=agent K3S_URL=https://192.168.1.xxx:6443 ./k3s-sysvinit-install.sh
#This will install K3S in worker mode and will connect to the cluster controller on 192.168.1.xxx:6443 using the specified token.
#Worker Service:
sudo service k3s-agent status/start/stop/restart
Download link:
https://drive.proton.me/urls/4GKT3SBAQC#syB0ofJ2LlSF
Troubleshooting:
If when you execute:
$ k3s kubectl get nodes
You get an error with last text line that says:
Unable to connect to the server: tls: failed to verify certificate: x509: certificate signed by unknown authority
Or when when you execute:
$ kubectl get nodes
You get this error that says:
The connection to the server localhost:8080 was refused - did you specify the right host or port?
And when you try to install helm/charts you get this error:
Error: Kubernetes cluster unreachable: Get "http://localhost:8080/version": dial tcp [::1]:8080: connect: connection refused
This happens because they are trying to communicate with the k3s server/controller without the proper settings/certificate.
Do this to fix it:
mkdir ~/.kube
sudo k3s kubectl config view --raw | tee ~/.kube/config
chmod 600 ~/.kube/config
echo "export KUBECONFIG=~/.kube/config" >> .bashrc
source ~/.bashrc
rev01:
- Added the K3S version tested.
- Added K3S_ROLE=server env. variable, this is not required by the original script but I have notice that having different nodes working as controllers or workers but with the command "sudo service k3s/-agent status" printing just "k3s is running/not running..." on any of them this is prone to errors/mistakes, so now if I specify the role as server or agent for the install then for example the command "sudo service k3s/-agent status" will print "k3s-server is running/not running..." for servers/controller or "k3s-agent is running/not running..." for worker nodes.
Also please notice/remember that the service command remains just "k3s" for server/controller but still "k3s-agent" for workers, that's how k3s works.
- Added the specific example how to install and join a second or third, etc, controller to an existing cluster controller. (yeah, I don't like when other people gives non-clear instructions"
- Added Troubleshooting, fix for "k3s kubectl get nodes" error, "kubectl get nodes" error and "helm connection refused" error.
#9 Documentation » [HowTo] Install Gitea on Devuan 5 » 2024-05-21 01:17:19
- joser
- Replies: 3
Kernel version: 6.1.0-18-amd64
Binary file: gitea-1.21.11-linux-amd64
Partition scheme: / 12%, swap 12%, /home -1
Does these matters? I don't know but I have tried this steps only on systems having exactly the same specs like above, so if you get any error message related for example to swap memory and you have only 1GB for swap then I won't know what to tell you but, increase the size for your swap partition and try again.
Update repository
sudo apt -y updateInstall git, curl, bash-completion and nano(optional) editor
sudo apt -y install git curl bash-completion nanoCreate user for git
sudo adduser \--system \-shell /bin/bash \--gecos 'Git Version Control' \--group \--disabled-password \--home /home/git \git
Install mariadb-server
sudo apt -y install mariadb-serverTo secure database execute the command below and (1. skip the root password
but 2. remove anonymous users=Y, and 3. disallow root login remotely=Y,
4. remove test databases=Y and 5. reload privilege tables=Y, done.
sudo mysql_secure_installationCreate database for gitea, change the StrOngPassw0rd value and please
save/write down/remember this password since you will need it to
configure the Gitea server via web.
sudo mysql -u root -pCREATE DATABASE gitea;GRANT ALL PRIVILEGES ON gitea.* TO 'gitea'@'localhost' IDENTIFIED BY "StrOngPassw0rd";FLUSH PRIVILEGES;QUIT;Download gitea linux binary
curl -s https://api.github.com/repos/go-gitea/gitea/releases/latest |grep browser_download_url | cut -d '"' -f 4 | grep '\linux-amd64$' | wget -i -Change mode to executable and move to destination folder
chmod +x gitea-*-linux-amd64sudo mv gitea-*-linux-amd64 /usr/local/bin/giteaConfirm gitea it's installed properly execute
gitea --versionCreate directories for gitea setup, yes, I use -R to create new folders also
sudo mkdir -p /etc/gitea /var/lib/gitea/{custom,data,indexers,public,log}sudo chown -R git:git /var/lib/gitea/{custom,data,indexers,log}sudo chmod -R 750 /var/lib/gitea/{custom,data,indexers,log}sudo chown root:git /etc/giteasudo chmod 770 /etc/giteaDownload gitea service file and nginx config file
https://drive.proton.me/urls/WPHKAVNY6C#bojwayYgFzWF
Extract gitea service file and nginx conf file
tar -xf gitea-install-devuan5-files.tar.gzAt this point you can and always should inspect the extracted files before to use them
cat gitea.servicecat gitea.confYou can change the domain name and port for your gitea server on gitea.conf
change listen and server_name values to whatever you want.
Create service for gitea
sudo mv gitea.service /etc/init.d/giteaMake it executable
sudo chmod +x /etc/init.d/giteaUpdate inid.d services
sudo update-rc.d gitea defaultsStart gitea service
sudo service gitea startVerify that gitea service is running,
valid options: start, stop, status, restart
sudo service gitea statusInstall nginx web server
sudo apt -y install nginxIf and only if ufw it's enabled, then:
sudo ufw allow 80/tcpsudo ufw allow 443/tcpCreate nginx config file for gitea
sudo mv gitea.conf /etc/nginx/conf.d/Restart nginx service
sudo service nginx restartFinal steps:
1. Open http(s)://localhost on your web browser
2. Type the same password as when you changed it from StrOngPassw0rd to whateveryou changed it to.
3. Change the "Site Title" to whatever you want to name your repository server.
4. Set the email server if you have one, or leave it empty if not.
5. Set the options for Server and Third-Party Service Settings.
6. Set your Administrator Account Settings.
7. Click "Install Gitea".
8. The tea cup animation with the text "Loading..." is displayed, wait.
9. Viola, all done, Gitea Server ready.
Credits to https://computingforgeeks.com/install-g … on-debian/
Adapted to work on Devuan 5 by joser for dev1galaxy.org
Pages: 1
Board footer
