You are not logged in.
- Topics: Active | Unanswered
#401 Re: Off-topic » Mate and Trinity » 2019-07-20 01:16:52
dzz has a Devuan-based distro that uses Trinity. ![]()
#402 Re: Off-topic » Systemd in regards to Linux distributions' size & performance? » 2019-07-17 21:28:34
MiyoLinux wrote:All of my beowulf and ceres installs shut down and restart normally (two beowulfs: one with Openbox and one with LXQt. One ceres with Openbox). I'm using slim on the Openbox installs and sddm on the LXQt install...but then again, they probably work for me, because I'm special and know stuff...secret stuff.

Let me guess: polkit rules?
My comments were based on the stock XFCE desktop and beowulf hasn't been released yet, I'm sure it will all be working when it is.
I'm not telling, because it's a secret. ![]()
#403 Re: Devuan Derivatives » [MiyoLinux] New Releases Uploaded » 2019-07-17 21:27:15
For anyone interested, I've made some live .isos that will allow you to manually install beowulf using debootstrap.
From the welcome screen and instructions...
While Deboot-Beowulf does indeed allow you to install Devuan Beowulf before Beowulf is officially released, the main philosophy behind this is to hopefully be a learning tool for those who may want to learn more, experiment, or just try something different.
Be aware, while you can certainly install a fully usable Beowulf system, Beowulf is still considered Devuan's testing release. Therefore, you may experience bugs or breakage. For example, at the time of this writing, PulseAudio is not working in Beowulf; you will have to use Alsa for sound.
The debootstrap instructions will guide you step-by-step in helping you to MANUALLY install a Devuan Beowulf system using debootstrap. The vast majority of commands can simply be copied and pasted into the terminal; however, there are no point-and-click options. When you reach the package installation step, you will need to know what packages you want to install and what the package names are called. If you're unsure about this, please read over the debootstrap instructions to see if you're willing to proceed.
The guide assumes that the user has a knowledgeable understanding of...
a) partitioning a hard drive
b) manually installing the packages needed for a working desktop (an example for installing LXQt is provided in the instructions)
c) where to install grub
d) how to use ncurses windowsWhile UEFI can be made to work in Beowulf, due to its current state, Deboot-Beowulf .isos are only available as BIOS versions. They are available as x86_64 and i686-pae.
A beta-version installation video can be viewed at the following link. Be aware, it's a full installation video and is over an hour long.
https://www.youtube.com/watch?v=vzVP5GNi6NM
The software is provided "as is", without warranty of any kind, express or implied, including but not limited to the warranties of merchantability, fitness for a particular purpose and noninfringement. In no event shall the authors or copyright holders be liable for any claim, damages or other liability, whether in an action of contract, tort or otherwise, arising from, out of or in connection with the software or the use or other dealings in the software.
The .isos are available here...
https://sourceforge.net/projects/miyoli … bootstrap/
Have fun! ![]()
#404 Re: Hardware & System Configuration » Grub.cfg not recognised in Beowulf » 2019-07-17 21:21:04
MiyoLinux wrote:IHere are the packages that it says can be removed with an apt autoremove...
mokutil shim-helpers-amd64-signed shim-signed shim-signed-common shim-unsignedThose packages are needed for Secure Boot support and manipulation of the machine owner keys (MOK).
Thank you HoaS.
#405 Re: Hardware & System Configuration » Grub.cfg not recognised in Beowulf » 2019-07-16 06:34:29
I have a question since I don't have much experience with actual UEFI computers. I'm doing an UEFI beowulf install in Virtualbox via debootstrap. When removing the grub-efi-amd64-signed package, it lists several other packages that can be removed with an apt autoremove.
Is it safe to remove them?
If a list of the packages is needed, just let me know. I was hoping someone who has already done this will have the answer. ![]()
EDITED TO ADD: Here are the packages that it says can be removed with an apt autoremove...
mokutil shim-helpers-amd64-signed shim-signed shim-signed-common shim-unsigned#406 Re: Off-topic » Systemd in regards to Linux distributions' size & performance? » 2019-07-15 21:49:48
and Devuan can't shutdown or restart the system without root privileges (I presume the login session isn't fully functional yet).
All of my beowulf and ceres installs shut down and restart normally (two beowulfs: one with Openbox and one with LXQt. One ceres with Openbox). I'm using slim on the Openbox installs and sddm on the LXQt install...but then again, they probably work for me, because I'm special and know stuff...secret stuff. ![]()
![]()
#407 Re: Off-topic » Music » 2019-07-15 08:31:52
My dad gave me my first guitar, but my first purchased guitar came from the lead singer/bass player's music store. ![]()
They somewhat drifted off into obscurity...as did my guitar playing. LOLOLOLOL!!! ![]()
#408 Re: Hardware & System Configuration » UEFI /etc/fstab request » 2019-07-09 20:36:34
Thanks kapqa!
...and thanks HoaS! The arch-install-scripts package looks interesting. I'll check that out. Thanks for all of the additional information too.
#409 Re: Hardware & System Configuration » UEFI /etc/fstab request » 2019-07-09 10:47:53
Well, despite my unfamiliarity with UEFI, I somewhat understand it's short UUID. My main concern was the differences under the "Options". Every example that I've found online said to "enter something like this" in the fstab file. ![]()
So, I have many BIOS fstab files to compare...but no UEFI fstab files. I couldn't find one single example of an UEFI fstab file online. So, I went the Virtualbox route...which caused confusion for me. LOL! ![]()
So, I risked embarrassing myself to ask for help. ![]()
Thank you.
#410 Re: Hardware & System Configuration » UEFI /etc/fstab request » 2019-07-09 10:21:02
Ahhh...thank you dxrobertson!
So my gut feeling was wrong! LOL! ![]()
Your actual file looks exactly...well...almost exactly...like mine in Virtualbox. I edited out all of those commented out lines when I posted it here on the forum.
Thank you so much!
If anyone else is willing to post their's, I would greatly appreciate it.
Thanks again!
#411 Re: Hardware & System Configuration » UEFI /etc/fstab request » 2019-07-09 09:48:13
Thanks Dutch_Master. ![]()
I appreciate the link, but that's not really what I was looking for. Perhaps I wasn't clear enough in what I was asking? ![]()
I'm currently working on a project; in which, a user will need to edit and make their own fstab file. In addition to BIOS instructions, I would like to include instructions for users who may be using UEFI. Since I don't have an actual UEFI computer, I can only go by the fstab files generated by Virtualbox installations. Perhaps my predicament is best understood by being visualized...
Below are the fstab files from two UEFI installations in Virtualbox. The first one is a MiyoLInux installation (based on ASCII). The second is a pure Devuan ASCII installation. The information following the UUIDs of both fstab files that were generated are very different...and confusing to me because of that. My gut tells me that the MiyoLinux fstab is closer to what would be correct on real hardware, but I'm not sure. That's why I was hoping someone with an actual UEFI installation on real hardware might be willing to share their fstab file. ![]()
The MiyoLinux UEFI fstab

UUID=a-bunch-of-letters-and-numbers	/		ext4	defaults,noatime	0	1
UUID=a-bunch-of-letters-and-numbers	/home		ext4	defaults,noatime	0	2
UUID=a-bunch-of-letters-and-numbers	swap		swap	defaults		0	0
UUID=a-few-letters-and-numbers		/boot/efi	vfat	defaults		0	1

The Devuan ASCII UEFI fstab

UUID=a-bunch-of-letters-and-numbers	/		ext4	errors=remount-ro	0	1
UUID=a-few-letters-and-numbers		/boot/efi	vfat	umask=0077		0	1
UUID=a-bunch-of-letters-and-numbers	/home		ext4	defaults		0	2
UUID=a-bunch-of-letters-and-numbers none swap sw 0 0#412 Hardware & System Configuration » UEFI /etc/fstab request » 2019-07-09 04:36:42
- MiyoLinux
- Replies: 11
Hi everyone!
I'm working on a project, and I was wondering if anyone here who has an installed system (which uses UEFI) would be willing to post the contents of your /etc/fstab file?
If you don't want to share your UUIDs, that's fine, I'm mainly interested in the items that follow the UUIDs. If you have a separate /home partition listed, that would be much appreciated. ![]()
I don't have a UEFI computer, and though I've installed Devuan in UEFI in virtualbox, I would like to compare its UUIDs to an actual hardware installation's.
Thank you. ![]()
#413 Re: Off-topic » Show your desktop (rebooted) » 2019-07-04 08:27:30
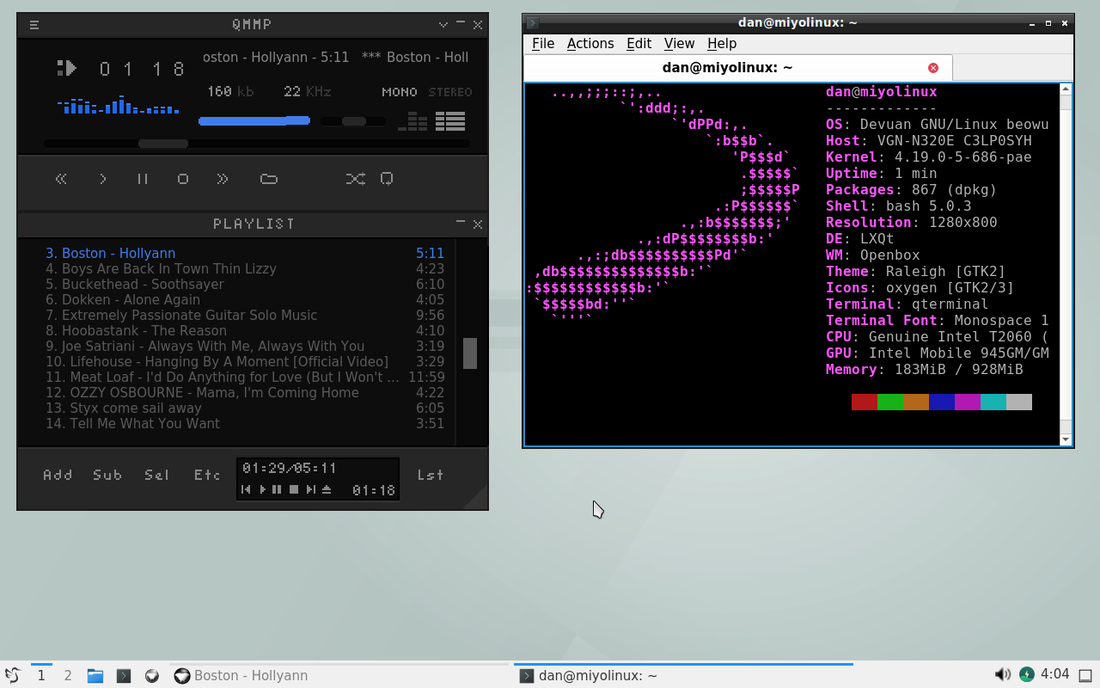
Freshly installed Devuan Beowulf LXQt via debootstrap. ![]()
LXQt core installed (without recommends) to avoid pulling in pulseaudio.
Installed alsa-utils and volumeicon-alsa for sound and volume control; removed the native volume icon from the panel and am autostarting volumeicon on the panel for volume control.
QMMP music player to keep things Qt and light.
First time trying the Falkon browser...seems okay for now.
Still have to get things set up like I want.
#414 Re: Off-topic » Music » 2019-06-26 09:21:05
#415 Re: Devuan Derivatives » A question to Miyo regarding Miyo-Linx, i3 version » 2019-06-23 18:45:10
That's great!
I hope you enjoy using it! ![]()
#416 Re: Devuan Derivatives » A question to Miyo regarding Miyo-Linx, i3 version » 2019-06-23 12:22:30
Hi nn! Thanks for your interest. Indeed, the idea behind Miyo-i3 is to hopefully make it a little easier to use i3.
I agree with fsmithred; in that, solving the current issue would be the quickest solution. I have a video showing how to install Miyo-i3; however, it's for the Beowulf edition...so, the installer is slightly different during part of the installation...but it should still help. Here's a link to the video...
With that said, believe it or not...despite the technicalities of i3, Miyo-i3 is actually the easiest version of MiyoLinux for me to build. ![]()
I don't mind packaging everything up (along with instructions) and making it available for you to download. You would then just have to put the various files and folders in their proper places according to the instructions. Of course, you would need to already have i3 installed first. ![]()
I've also been considering making a script to do the same thing, but I haven't even started on that yet. ![]()
#417 Re: Desktop and Multimedia » Software update notifications in XFCE » 2019-06-08 10:51:24
MiyoLinux wrote:Okay, I've worked on the package, and this is the only warning that I'm getting...
W: miyo-update-notifier: binary-without-manpage usr/bin/show-updatesSo, my question is...
Is this detrimental to whether the package can be trusted by people who may want to use it?
I don't think so, no. Man pages are nice but hardly essential for a script which has no options.
For scripts that do have options you can use the help2man package to generate a simple man page without having to actually write one yourself.
I would test your package but I use unattended-upgrades and I don't run the notification daemon, sorry.
It looks like it should work though, FWIW.
EDIT: if you wanted to add a man page then include it at (for example) debian/show-updates.1 and then add a file at debian/miyo-update-notifier.manpages with a line listing the location of the man page:
debian/show-updates.1The page will then be placed correctly by dpkg-buildpackage.
That command should be listed under section 1 of the man pages, man man gives an overview of these in the DESCRIPTIONS section:
man man wrote:The table below shows the section numbers of the manual followed by the types of pages they
contain.1 Executable programs or shell commands
2 System calls (functions provided by the kernel)
3 Library calls (functions within program libraries)
4 Special files (usually found in /dev)
5 File formats and conventions eg /etc/passwd
6 Games
7 Miscellaneous (including macro packages and conventions), e.g. man(7), groff(7)
8 System administration commands (usually only for root)
9 Kernel routines [Non standard]
Thank you HoaS!
I want to be like you when I grow up! ![]()
It works; I tested it before I uploaded it. It works perfectly. I think that I'll let it stand "as-is" for now. Thank you so much for your help...I learned a few things from what you posted. ![]()
EDITED TO CORRECT A WORD... ![]()
#418 Re: Desktop and Multimedia » Software update notifications in XFCE » 2019-06-08 10:04:30
MiyoLinux wrote:....now where did I put that chmod?
I think you'd need to look for it in Lost + Found

(sorry, couldn't resist!)
LOLOL!!! ![]() Good one!
Good one!
Okay, I've worked on the package, and this is the only warning that I'm getting...
W: miyo-update-notifier: binary-without-manpage usr/bin/show-updatesSo, my question is...
Is this detrimental to whether the package can be trusted by people who may want to use it? Good grief...going in and fixing the issues caused other issues that caused me to have to fix other issues in order to fix the original issues... ![]()
I've looked at the man folder on my system to try and get some clue, but there are so many sub-folders, I'm not sure where to begin to put a man-page for the notifier!
Goodgrief'amightyIt'salmostasthoughDebianhassometypeofstandardsthattheywanttobemetforsomereasonStinkin'hotdogwithoutrelishandI'mabouttohaveanervous-jerkdownandmightymorphinpowerrangers!!!
![]()
![]()
If anyone is willing to test it again, it is version 1.1, and it can be downloaded from...
#419 Re: Desktop and Multimedia » Software update notifications in XFCE » 2019-06-07 21:21:41
YIKES!
Thank you so much HoaS!
....now where did I put that chmod?
![]()
![]()
#420 Re: Desktop and Multimedia » Software update notifications in XFCE » 2019-06-05 06:32:01
Hello everyone; I hope you're doing well! ![]()
I've created a .deb package for the update notifier that has been discussed here...
It's a simple notifier that checks for updates every 4 hours. When updates are available, a desktop notification will appear as well as a system tray notification. If you click on the icon in the system tray, a notification window will open that presents the updates that are available (thanks fsr!). Please be aware that you will still have to update manually through your terminal or Synaptic...it's just a notifier. ![]() I chose this route, because I wanted the user to be able to decide if they wanted to install the updates "now" or "later".
I chose this route, because I wanted the user to be able to decide if they wanted to install the updates "now" or "later".
Also, please be aware that if you're using an obscure window manager (such as i3), you will need to add the update-notifier.py to your autostart file. The update-notifier.py will be found in /usr/share/update-notifier/
I would appreciate anyone who is willing to test it for me. ![]() After installing it, you will need to at least log out and log in for it to start working.
After installing it, you will need to at least log out and log in for it to start working.
It can be downloaded from...
#421 Re: Off-topic » Music » 2019-05-19 01:10:16
Head East: Never Been Any Reason
#422 Re: Off-topic » Show your desktop (rebooted) » 2019-05-13 02:57:56
That looks great T-wax...thanks for sharing!
To make an .iso...
1. Open the file manager as root, and go to /usr/share/applications
Find the Refracta Installer, right click on it, and choose to open it with your text editor.
Find the line NoDisplay=true
Place a # in front of that line, then Save and Close the file.
That should make the Installer appear in your Menu.
2. Optional, but you may want to run Bleachbit and Bleachbit (as root) to shave some size off of the .iso.
If you do run them, reboot your computer after doing so.
3. Open the Terminal, and enter...
sudo refractasnapshot
(use su if you prefer)
a) You'll be greeted with some information. Use your down arrow key to scroll further down if needed.
b) Press the Q key on your keyboard to move to the next step. I can't remember if you have to hit Enter on your keyboard after pressing the Q key.
c) When prompted, you'll want to choose option 1, so type in the number 1 and hit Enter on your keyboard.
d) When prompted, you can change the name that will appear on the Live System's grub screen. Change it if you want. Hit Enter on your keyboard.
It will then begin the process of making the .iso. Be patient. Depending on how much is on your system, it could take a while. Leave the terminal open the entire time. You'll be notified when the .iso is complete with a message that says "All finished!"
You can then find the .iso in your Home folder in the snapshot folder. You'll need to go to the Filesystem option in the file manager, click on the Home folder, and you'll see the snapshot folder there.
Thanks again, and good luck! ![]()
#423 Re: Devuan Derivatives » [MiyoLinux] Miyo-i3 Releases » 2019-05-11 18:05:33
Wow. You are not lazy miyo. A lot went into your i3/beowulf work. I have been very happy with i3/pcmanfm/ascii and then beowulf upgrade for some time now. I figured I could get some new info from your efforts and I have already. Many Thanks.
Thank you catprints. ![]()
Yes, well...not being one to brag, but yes...it's true. I am the Distro-Ninja, the OS-Extraordinaire, the King-of-Desktop-Bling, the Master-of-Linux-Casters.
LOLOLOLOLOLOLOL!!! ![]()
Sorry...I couldn't resist. ![]()
I do hope it was helpful, and thank you for the kind words. Take care!
#424 Re: Devuan Derivatives » [MiyoLinux] Miyo-i3 Releases » 2019-05-10 07:55:28
Hi everyone!
Sorry...I'm battling a migraine, so I'll keep this short and sweet. Just wanted to let anyone interested know that there are new Miyo-i3 versions available...based on beowulf.
#425 Re: Off-topic » Music » 2019-05-10 07:52:52
MiyoLinux wrote:
Fun music!Conway Twitty: It's Only Make Believe
Good song. I like Glen Campbell's version best:
Speaking of Glen Campbell...his guitar playing was amazing. People like to talk about shredding a guitar. He could shred it, put it back together, and then shred it again. ![]()
Board footer
